
Why we self-host our serverless Next.js site on AWS with Terraform
Last summer we had the idea to publish our Next.js site serverless on Amazon Web Services (AWS). Because we live in Germany and Vercel only supports a few of AWS regions for deploying your site in Europe (closest to Germany is Paris/France) we began a search how we could deploy our website to the AWS Frankfurt region.
TL;DR
- We didn't want to rely on a cloud service (Serverless Components or Vercel) for deploying our application
- Deploying our app should require nearly zero-config and support all major Next.js features
- We created an Open Source Terraform module for doing it: Terraform Next.js module for AWS
- How-to tutorial at the end of the article: Deploy Next.js to AWS
By the time there were only a few choices for doing that and the most promising of them was the serverless-next.js project that is based on the Serverless Framework. By this time Serverless announced a new product called Serverless Components. While it was introduced as a simpler way to deploy applications based on cloud functions, they also changed the way the deployment works: Instead of bundling and uploading it directly from your machine, you now had to use their cloud service, upload the source there and the Serverless cloud would then build and provision your app on AWS.
While this concept isn't something really new (Vercel does it the same way) we kept searching for a another way without relying on cloud services to build our app and risk a vendor lock-in.
That time we also began using Terraform to manage our existing resources on AWS (Like domains, Static files on S3 buckets, CloudFront distributions, etc.). Terraform is an Open-Source tool by HashiCorp for creating a code-based abstraction of your cloud resources and services (Similar to CloudFormation but not limited to AWS, since their open provider concept allows to manage resources even across multiple cloud providers).
Becoming independent
While transitioning some of our infrastructure to Terraform we draw a few diagrams of our existing AWS services to define how they are connected with each other (e.g. which CloudFront distribution should be served from which S3 bucket). This is a really powerful concept in Terraform: You don't just say which resources and services you want to create, you can also connect them with code-based rules.
At one time we drew a diagram of how a serverless architecture of our site with pure AWS services would look like:

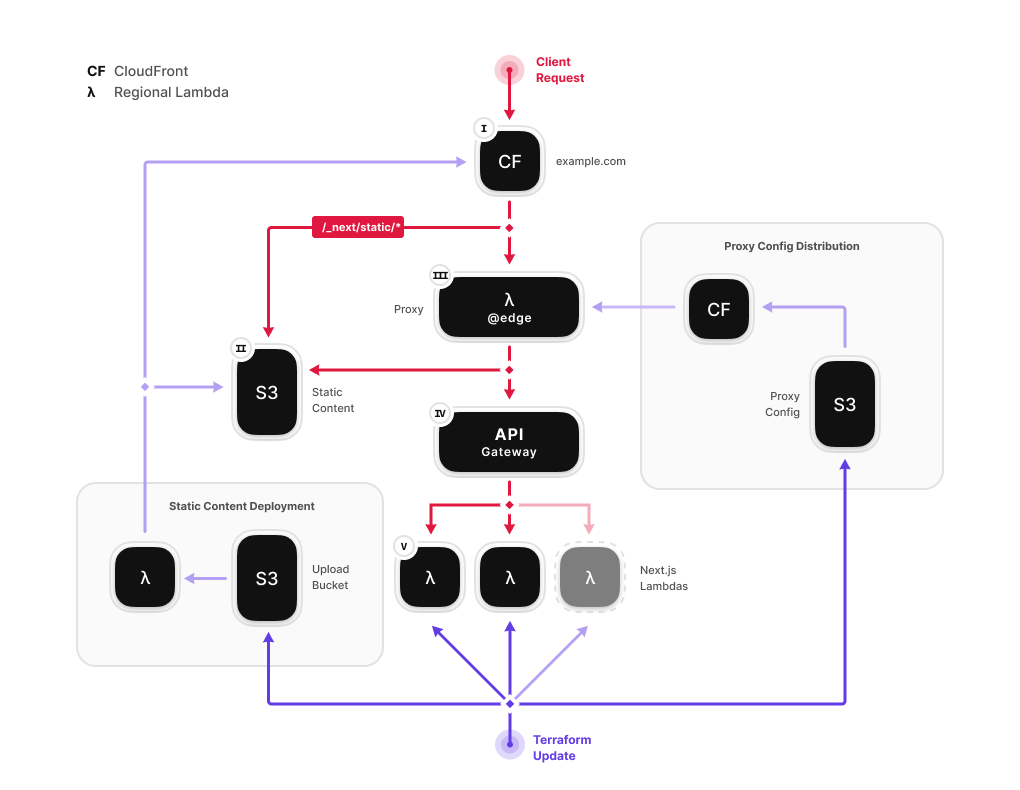
The idea was simple: Zero config in our Next.js app and let Terraform do the heavy lifting deploying our site to AWS.
While it is relatively easy to do static hosting with Next.js on a S3 bucket and a CloudFront distribution, it is a bit more difficult to include server-side rendering (SSR) in this stack. CloudFront is the CDN service from AWS that allows you to distribute static content like HTML, JavaScript or images in edge locations near your visitors so that following requests can be cached without hitting the origin resources. This way a site can be served with pretty low latency to customers around the globe while only paying a fraction of the costs that a request to the origin resource would cost.
While CloudFront is good for reducing the load time of the site, it also offers a service called Lambda@Edge that allows us to run server-side code in these edge locations. This is a major key where our architecture is different from the serverless-next.js component: Serverless uses these Lambda@Edge functions to generate the SSR content while we only use it to determine from which origin the content should be served.
Understanding the Next.js routing
Next.js has a built-in router called next/router. The router is designed to work both on the client and the server side. In local development they work pretty similar on each side but when exporting the site to a serverless architecture the app gets splitted into different parts:
-
Static assets (e.g. JavaScript, CSS, Images)
These are files that have a hashed filename (likesome.chunk.14f293g29.js) and are not modified over time. Instead they get a new name when a new deployment is made. -
Static routes
Static routes are the ones that do not use parameters in their path (e.g.example.com/about) and do not callgetServerSideProps(). These routes are pre-rendered at build time and packaged as static HTML files. So these routes can only be modified by a new deployment of the site. -
Dynamic routes
Dynamic routes in Next.js need a server to render the corresponding HTML. That includes pages that are dynamically rendered (e.g. with data from a database) or use a dynamic parameter in their path (example.com/blog/[postId]) where the final paths could not be calculated at build time.
Since the static routes should not trigger a server (in our case the AWS Lambda function), we need to find a way to split the static and dynamic traffic before it hits the server.
This is very simple for static assets, since all of their paths begin with /_next/static/... so we can create a simple CacheBehavior in CloudFront that looks for this prefix and redirect all requests for them to a S3 bucket where we uploaded our assets.
For static and dynamic routes this is more complicated: Since a request for a static site looks exactly the same as for a dynamic route (e.g. example.com/about, example.com/blog/123) we need a custom logic that can decide if the route is static or whether it should be server-rendered by a Lambda.
To accomplish this task we created a custom component called Proxy which is simply a serverless Node.js function that is able to determine where a route should be served from. Since this proxy is a crucial part for the performance of the site it is deployed directly at the CloudFront edge locations with Lambda@Edge.
This is a trade-off we make here because running code in Lambda@Edge is three times more expensive than running the code in regional Lambdas. So we paid attention that the code for the proxy has as few dependencies as possible and can be executed really fast once the Lambda is warmed up.
We built the proxy logic so that it behaves in the same way as Vercel does with their routing configuration. This way we ensured a maximum of compatibility with the way Vercel does deployments and were able to recreate features for Next.js that they offer.
Preparing Next.js for a serverless environment
It seems strange at first that we need that much effort to make Next.js serverless because seeing it running on Vercel so smoothly, you may think it is a native serverless application.
That's wrong. Next.js at its core is simply a Node.js webserver and even on Vercel it runs as a server rather than a serverless function. The trick here is to convert the invoke event from the cloud function to a HTTP server request and then parse the HTTP server response back to a callback parameter of the function:

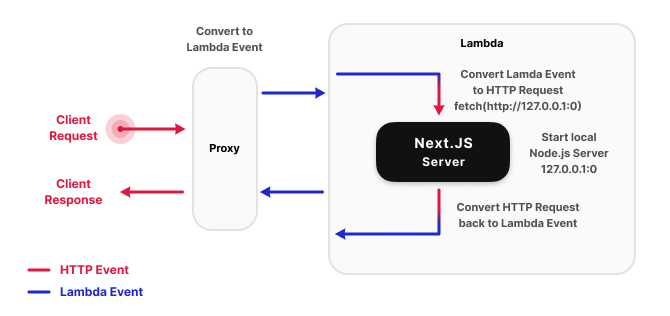
In AWS Lambda with JavaScript you can simply achieve this by starting a local HTTP server for each invocation and then create a client request to get the server response like this:
// Reference implementation how to start a Next.js webserver inside a Lambda
// from API Gateway invocation
// https://docs.aws.amazon.com/apigateway/latest/developerguide/http-api-develop-integrations-lambda.html

const { request } = require('http');

// Import the generated Next.js server from somewhere
const NextServer = require('./dist');

exports.handler = async function (event) {
  // Deconstruct API Gateway event
  const {
    http: { method, path },
  } = event.requestContext;

  // Start local server and get address once it's running
  const address = await new Promise((resolve) => {
    const server = new NextServer();

    server.listen(
      {
        host: '127.0.0.1',
        port: 0,
      },
      function listeningCallback() {
        const addr = this.address();
        resolve(addr);
      }
    );
  });

  const payload = await new Promise((resolve, reject) => {
    request(
      {
        hostname: '127.0.0.1',
        port: address.port,
        path,
        method,
      },
      (res) => {
        const respBodyChunks = [];
        res.on('data', (chunk) => respBodyChunks.push(Buffer.from(chunk)));
        res.on('error', reject);
        res.on('end', () => {
          const bodyBuffer = Buffer.concat(respBodyChunks);
          resolve({
            statusCode: response.statusCode || 200,
            headers: response.headers,
            body: bodyBuffer.toString('base64'),
            isBase64Encoded: true,
          });
        });
      }
    );
  });

  return payload;
};
Over time there emerged multiple solutions for doing this but all of them require a lot of additional configuration to make it work. Since our goal was to require as little configuration as possible, we took a closer look how Vercel achieved this.
What makes Vercel a really outstanding company is that they open sourced a lot of their internal tooling. They use a package called now-next that does the packaging of Next.js before it gets deployed to their infrastructure (The name "now" comes from the time the company was named Zeit, which means "Time" in German, which was a pretty great naming in my opinion, since I am German too 😊).
Because the routing logic of our proxy component reproduces the behavior of the Vercel proxy it was now pretty easy for us to make the output from their builder to work with our architecture.
This way we achieved a similar developer experience that Vercel has while running the whole build and deployment process on our own machine.
Deploy Next.js to AWS
Okay, we talked a lot about why and how we built the architecture the way it is, now it is time to show you the whole thing. Because we profited a lot of Open Source in this project and in the past, we decided to make the module publicly available too:
Installation and deployment can be broken down to a few easy steps, so if you have a minute left to spend, here is how you can deploy your own Next.js app to AWS:
Prerequisites
- Make sure you have Terraform installed.
- Create AWS Access Keys (
Access Key ID&Secret Access Key) from an AWS Account with admin privileges. - Create a new file in the root directory of your Next.js project called
main.tfwith the following content:
# main.tf
terraform {
  required_providers {
    aws = {
      source  = "hashicorp/aws"
      version = "~> 3.0"
    }
  }
}

# Main region where the resources should be created in
provider "aws" {
  region = "us-east-1"
}

module "tf_next" {
  source = "milliHQ/next-js/aws"
}

output "cloudfront_domain_name" {
  value = module.tf_next.cloudfront_domain_name
}
Build the Next.js app
In the directory of your Next.js app run the bundler (don't worry if you have a custom next.config.js we got you covered):
npx tf-next build
Deploy the Next.js app
In the same directory now run the following commands:
# Make the AWS credentials available for Terraform
export AWS_ACCESS_KEY_ID=<your-access-key>
export AWS_SECRET_ACCESS_KEY=<your-secret-access-key>

# Initialize Terraform
terraform init
# Deploy your app
terraform apply
After Terraform successfully created the deployment, it you should show you the following output on your terminal:
> Apply complete!
>
> Outputs:
>
> cloudfront_domain_name = "xxx.cloudfront.net"
When you visit the https://xxx.cloudfront.net domain in your browser you should now be able to see your application deployed serverless on AWS!
Even if your app just don't need server-side rendering (SSR), our setup works for this too without any extra config.
We have made some example applications to try out on our GitHub repo to checkout:
-
Complete example (with SSR, static routes, rewrites and redirects)
-
Static example (no SSR, just static sites, still supports rewrites and redirects)
-
Custom domain (In case you just don't want to host your site on a xxx.cloudfront.net subdomain)
Thanks for reading this far, if you have questions or feature requests, you can reach us on Twitter or GitHub.
Have a great day!